Skip to content
Cold-hardy.com
  • Home
  • Plant list
  • Bamboo Shooting Calendar
    • Bamboo Shooting Dates
  • Login
  • Sign Up
  • Search Icon

Cold-hardy.com

Gardening is fun!

Growing Hibiscus rosa-sinensis from seed

Growing Hibiscus rosa-sinensis from seed

November 30, 2020 tarzan Comments 1 comment

This post is as far away from cold-hardy as it gets. This time, I tried growing tropical hibiscus seeds. After growing and hybridizing temperate Hibiscus moscheutos and later Hibiscus coccineus, I added completely non-hardy tropical Hibiscus rosa-sinensis to the list.

How hard can it be?

When I first tried growing the seeds, they were old and haven’t been kept in ideal conditions. None of the seeds germinated. I have successfully germinated at least 2 years old seeds of temperate Hibiscus moscheutos before, so I expected at least some success with the tropical variety as well. Seeds were not that old after all, 6 months at most.

The second time, I used fresh seeds and soon noticed they started sprouting. They emerged as typical Hibiscus with the same cotyledon as its siblings before. The only evident difference was the smooth glossy texture of the leaves.

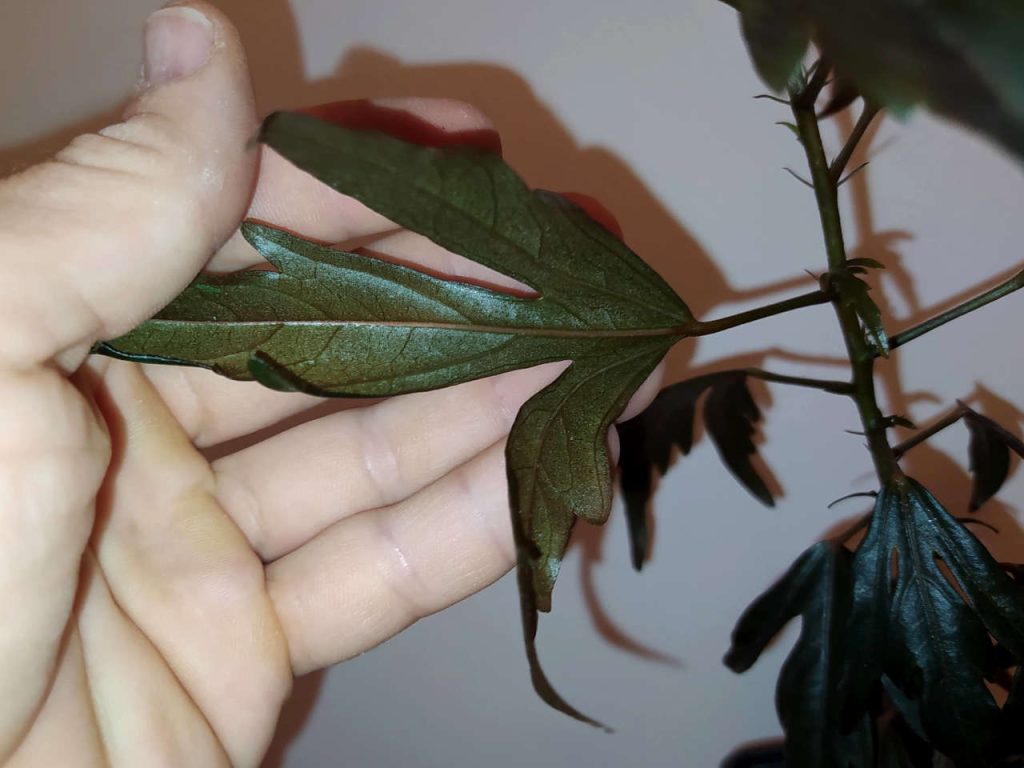
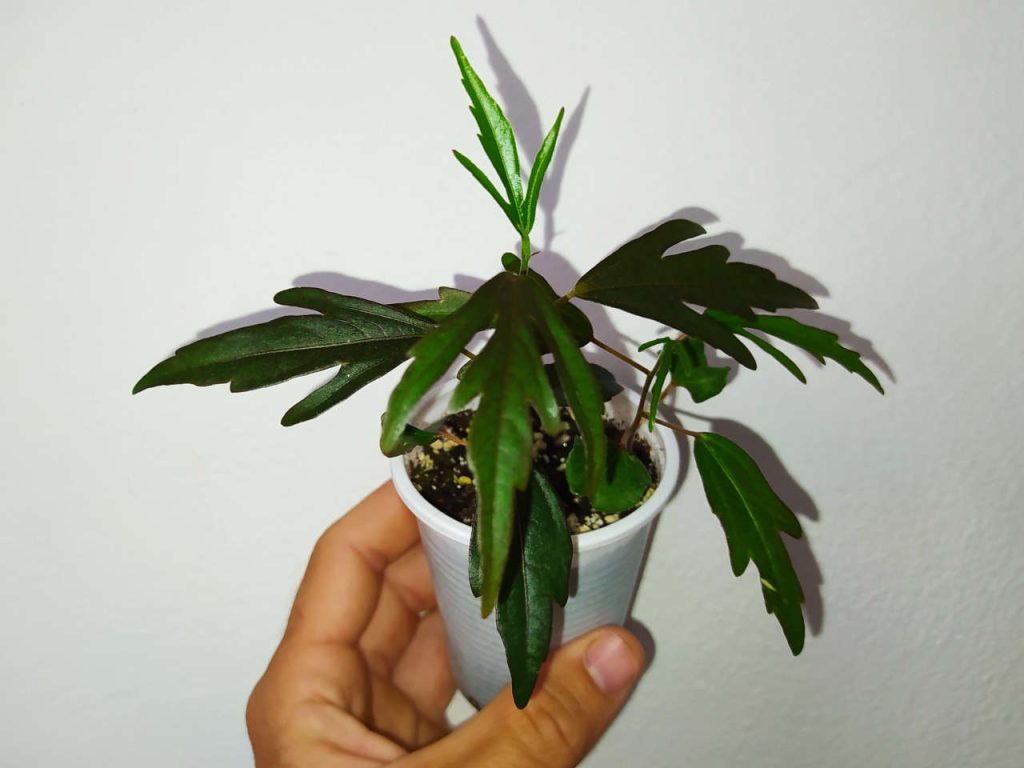
Leaves are dark brown on top with reddish-brown underside.

Brown leaves!

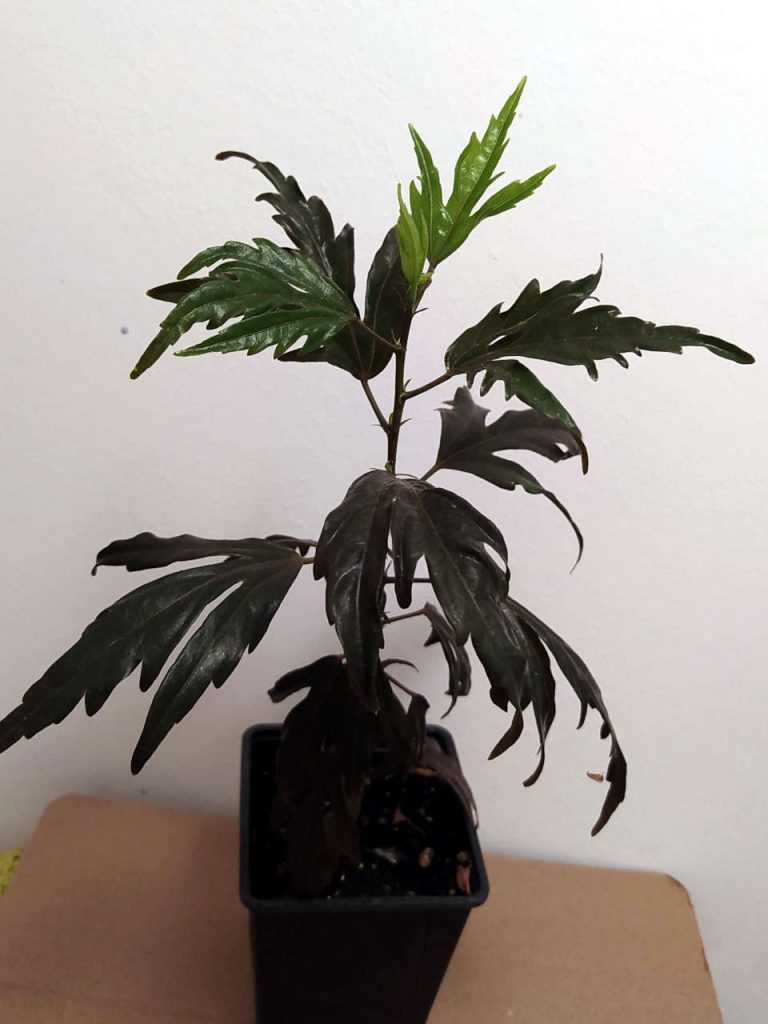
Soon after germination, first sets of true leaves emerged and they immediately started gaining red color under LED grow lights. Temperate hibiscus seedlings could get it, but it never got that extreme. Leaves that are originally dark green turned chocolate brown when the red leaf pigmentation formed. New leaves start light green and color-up as they mature. They really look unique with that dark colored leaves. Under LED grow light, they appear almost completely black.

Seedling diversity

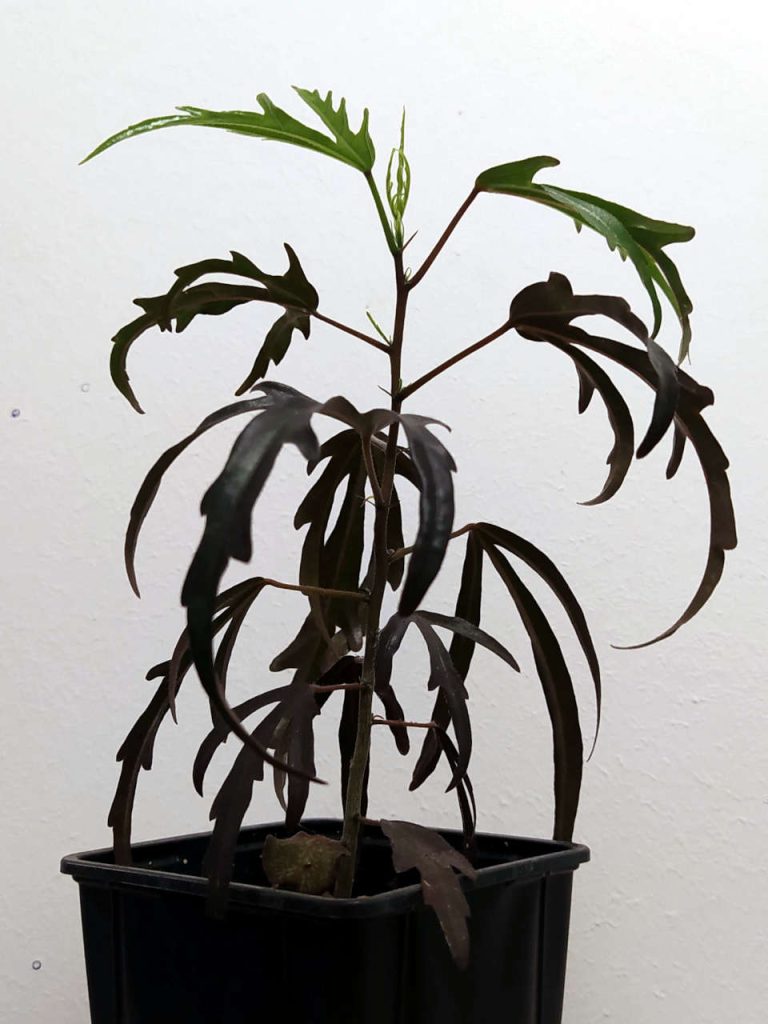
From the very beginning, leaves of the seedlings looked different. Since these are most likely juvenile leaves, they could eventually become identical. They both have leaves with 3 lobes. One of the seedlings have extremely thin lobes. I’m new to the tropical hibiscus seedlings so I got quite surprised by both its appearance and the fact how different their leaf shape is.

I will grow these two seedlings as potted plants and I’m looking forward to see how they develop. Their growth is getting very vigorous now. I’m afraid they could soon run out of space I can offer them, but for now, they are doing great. I might write an update when they mature and possibly even start flowering.

What do you think of this post?
  • Awesome (3)
  • Useful (2)
  • Interesting (0)
  • Boring (0)
  • Sucks (0)
Drosera spatulata propagation – cuttings

Drosera spatulata propagation – cuttings

November 30, 2020 tarzan Comments 0 Comment

The easiest and fastest option to multiply your Drosera spatulata (or many other Drosera plants) is making leaf cuttings. They can easily grow tiny plants which take a lot less time than growing seedlings. Let’s see how you can easily make cuttings of your Drosera spatulata.

Drosera-spatulata
Drosera spatulata ‘Fraser island’

What do you need?

Like mentioned earlier, Drosera spatulata easily grows small plantlets from leaf cuttings. They don’t need any help using rooting hormones or growth regulators, the only thing they need is water. Speaking of water, it needs to have low TDS value (total dissolved solids). That means the water doesn’t have much salts in it, which are usually present in ground or tap water. The best option is if you can collect rain water. I usually wait for a while and discard the first couple of hours of rain, so the atmosphere and the roof cleans up a bit. I measured TDS and it can make quite a difference. If collected rain is not an option, you can use RO (reverse osmosis) water or distilled water.

How do you make the cuttings?

Making leaf cuttings is easy, you need small scissors and forceps. I make a cut as close to the base of the plant as possible and discard old and damaged leaves. Using forceps I pick out the leaves I just cut and place them into petri dish, filled half-way with distilled water. You can also use a glass or any kind of container that holds water. In an experiment with Drosera capensis a few years ago, I used zip-lock bags, which also worked.

How long does it take?

It can take quite some time before you see the first signs of life. Young, healthy and large leaves will take faster and grow more small plants, while smaller, older or damaged leaves usually take longer and produces only a couple of plants, some even fail. It usually takes around a month to get them started, but it often takes longer, up to two months. Beside health of the cuttings, there are other key factors that can also affect the speed of propagation – light and temperature. Keep them in light place but not directly exposed to sun. They grow well under artificial lights, I have set the lights to 16 hour day length. I try to keep temperature between 20°C and 30°C.

Well fed Drosera spatulata. It single handedly eradicated fungus gnats infestation.

PROS / CONS compared to growing seedlings?

First there are pros:
Cuttings take off a lot faster than seedlings which can stay in their super tiny phase for quite some time.
When they first emerge, they can already start “hunting” small insects. Seedlings are usually too small to catch even the smallest springtails.
All the seedlings are identical to their parent plant – they are clones. That comes especially handy with Drosera hybrids that are not fertile.

Smaller leaves don’t give as many plantlets

Cons of taking cuttings are:
They are clones. There is no biodiversity in that, all the plants you get are identical, they have the same vigor, same shape, color,… As it is a good thing, it can be a bad thing as well. I like diversity!
By generative (sexual) reproduction, you can get hybrids and selectively breed your plants, trying to get their best characteristics and create a superior seedling. That alone makes it worth playing with the seeds, it’s just not to make a lot of plants in a shortest time possible.

What do you think of this post?
  • Interesting (2)
  • Useful (2)
  • Awesome (1)
  • Boring (0)
  • Sucks (0)
Unknown bamboo seeds: part 2

Unknown bamboo seeds: part 2

July 18, 2020 tarzan Comments 0 Comment

Growing bamboo seedlings again

I already started a post about growing bamboo seeds again this winter. Among many seeds I ordered online from a Chinese vendor on Aliexpress, I decided to try their bamboo seeds as well. Later I found that most of the received seeds were fake. Instead of stuff I ordered, I received all kind of weeds – perhaps I’ll write about growing those one day as well.

Spectabilis seedling on the left, Moso on the right

Bamboo seeds were true Phyllostachys seeds, the puzzle remains, though, their true ID. I ordered Phyllostachys pubescens ‘Moso’ and Phyllostachys aureosulcata ‘Spectabilis’ seeds. First one is readily available all the time, so it’s most likely correct, but the second one doesn’t flower at the moment which means it’s most likely fake. I assume that both seed packs had Moso seeds in them.

LED grow lights

Like all my latest seedlings, I’ve used full spectrum LED grow lights which proved to work very well, especially with Phyllostachys arcana ‘Luteosulcata’ seedlings. In the beginning, seedlings were slow to start and I expected that to happen with Moso seedlings. None of Moso seedlings I’ve tried growing could compete with other bamboo seedlings, they seem to be delicate and resent everything.

Darker green leaves of Moso seedlings. Newest leaves show nutrient deficiency

Later I noticed that grow lights don’t work as efficient as my previous LED chips. Other plants were also less vigorous, Drosera carnivores didn’t color-up as much as they could. Bamboo seedlings have a bit longer internodes than I remember which could be result of lower light intensity.

Yellow-ish colored seedlings

Some of the seedlings came out with some pigmentation issues. Affected seedlings were not completely albinic, yet, they were yellow or very pale green. Their leaves were delicate and didn’t stay alive long, they just shriveled and dried out. Lack of proper pigmentation resulted in extremely slow growth and much slower shooting cycle. To delay leaf loss of yellow leaved seedlings, I placed the seedlings further away from the light source and shaded them behind other plants.

The strange thing is, the seeds from both packs had different numbers of yellow seedlings. Moso pack hardly had any, while most of the Phyllostachys aureosulcata ‘Spectabilis’ wannabe seeds were sickly and yellow. Perhaps the seeds are not the same after all!

Small and pale seedlings. Larger darker green seedlings look crappy due to low light levels

Too early to ID

Seedlings are much larger now and they do well, especially considering they were neglected so far. Shoots of seedlings from both seed packs look like the Moso seedlings I’ve grown in the past. So far, they were not properly fed to show the nicely colored purple oral setae, I’ll see if they do color-up when I plant them separately. With a lot of imagination, tiny culms do seed to be a bit fuzzy, but it’s way too early to tell.

What do you think of this post?
  • Interesting (1)
  • Awesome (0)
  • Useful (0)
  • Boring (0)
  • Sucks (0)
Variegated Phyllostachys arcana seedlings 2020 update

Variegated Phyllostachys arcana seedlings 2020 update

July 4, 2020 tarzan Comments 0 Comment

Not a typical year

This year started normally, first shoots appeared in March as they always do. Then strange things started to happen. One of the seedlings (the most variegated one) stopped and refused to shoot until late May or early June, and even then, it only managed to produce a couple of thin shoots. Since it’s not overly shaded, the cause has to be somewhere else. I’ll try to get them into their final position as soon as possible! Other seedlings were acting normally. Compared to other Phyllostachys bamboos I have that also failed to shoot normally. Phyllostachys edulis ‘Moso’ for example shot small shoots when the first wave was completed, Phyllostachys aureosulcata ‘Spectabilis’ shot twice with one month pause between the shootings. Phyllostachys aurea waited until late June to even start shooting, which is way later than ever.

Regular green seedling on the left and variegated seedling on the right.

Upsize? – yes and no

I expected upsize this season, because bamboos are still in fairly juvenile state. One of the seedlings did grow thicker culms, but other bamboos remained roughly the same size. They did, however, produce quite a lot of new growth. With the exception of one that I mentioned earlier which took a year off.

Culm coloration

Culm diameter is now large enough to check how the culm variegation looks like. This time, it’s much more evident that there’s a fancy kind of striping all around the culm surface. Variegation of culms is similar to leaf variegation. At first it’s not as evident, but with time in a month or two, the color difference grows bigger and I expect the striping eventually to become even more pronounced. with larger number of shoots, there are more and more variations of the coloration. At first there were no culms with large, thicker striping, now they start appearing. They are far easier to spot than thin striped variegation which visually blends into a less dark green color, especially from afar.

Leaf variegation

New leaves on old growth (seedling #1)

Leaf variegation remained the same. First two seedlings are far more yellow and progressively receive more and more chlorophyll with each additional leaf. By he end of the autumn, some of the new leaves can appear completely dark green. The third seedling is a mix of similarly progressive variegation and part of it seems to have regular white striping on the dark green foliage. I’ll try separating these two visually distinct parts and check if they stabilize. Perhaps the seedling is chimeric.

New growth on one year old culms. Seedling #2

Leaves that start growing on last year’s growth have much more green from the beginning. They are not thinly striped like those on new shoots but have way thicker and well defined stripes. These leaves are usually less likely to show sun related damage.

Bamboo for a shaded location

  • Sunburnt leaves
  • Leaves in a more protected position

Damage is not as severe as last year

As expected from last year’s experience, the dramatically variegated seedlings are prone to sunburn. Parts which are exposed to sun most of the day get damaged pretty quickly. The more protected leaves (shaded inside) and the western side of the clump show much less sunburn damage. The first leaves that appear are the most delicate as they are usually completely yellow. Luckily they fall off as soon as bamboo leafs out completely.

New leaves are really bright yellow

Despite evident leaf damage, they don’t suffer and rhizomes start crawling in all directions as soon as new shoots grow their foliage. It grows much slower than green version of the seedling, but still -they are quite aggressive. I have had some escapees already and I planted one into a container – unlike last year, it survived. Previously, it ran out of resources as its leaves were yellow and it couldn’t regain strength in time.

What now?

Leaf color contrast

Seedings reached the point where they started growing one into another into one mixed grove. I’ll have a hard time separating them, despite their distinctive features (I’ll have to separate all the roots thoroughly) when I plant them into their new location. At that point, they will have much more space and growth potential to further develop into mature bamboo plants. Hopefully I’ll manage to plant them this year.

What do you think of this post?
  • Awesome (0)
  • Interesting (0)
  • Useful (0)
  • Boring (0)
  • Sucks (0)

Posts navigation

OLDER POSTS
NEWER POSTS

Recent Posts

  • Bamboo shooting date analysis – 2012-2024
  • Impatiens niamniamensis – Parrot impatiens pollination
  • Culm color of variegated Phyllostachys arcana seedlings
  • A Comprehensive Guide to Growing Rhododendron from Seeds
  • Cultivating Springtails for Terrarium Success

Latest Post Images

Post imagePost imagePost imagePost imagePost imagePost imagePost imagePost image

Recent Comments

  • tarzan on Blueberry seeds
  • Graydon on Blueberry seeds
  • Tomas Dvořák on Bamboo Shooting Calendar
  • Tomas Dvořák on Bamboo Shooting Calendar
  • Tomas Dvořák on Phyllostachys arcana seedling’s culm coloration

Categories

Recent Posts

  • Bamboo shooting date analysis – 2012-2024
  • Impatiens niamniamensis – Parrot impatiens pollination
  • Culm color of variegated Phyllostachys arcana seedlings
  • A Comprehensive Guide to Growing Rhododendron from Seeds
  • Cultivating Springtails for Terrarium Success

Recent Comments

  • tarzan on Blueberry seeds
  • Graydon on Blueberry seeds
  • Tomas Dvořák on Bamboo Shooting Calendar
  • Tomas Dvořák on Bamboo Shooting Calendar
  • Tomas Dvořák on Phyllostachys arcana seedling’s culm coloration

Categories

Archives

Tag Cloud

alba Aquatic plants arcana bamboo blueberries blueberry borinda cape capensis carnivore carnivores carnivorous clumper color culm cuttings damage drosera edulis fargesia featured feeding fungosa Germination leaf Luteosulcata moso overwintering phyllostachys plant propagation protection pubescens running seed Seedling seedlings seeds shoot shooting spring sundew variegated variegation winter
© 2025   COLD-HARDY.COM