Skip to content
Cold-hardy.com
  • Home
  • Plant list
  • Bamboo Shooting Calendar
    • Bamboo Shooting Dates
  • Login
  • Sign Up
  • Search Icon

Cold-hardy.com

Gardening is fun!

Flowers are identical to those of their parents
Blueberry seedlings update

Blueberry seedlings update

April 17, 2017 tarzan Comments 6 comments

Two years old seedlings

2 years old blueberry seedling during late winter

Two years ago, I have started growing blueberries from seeds. I have collected some of the seeds from large healthy fruits on my old blueberry plants. After stratification, seeds germinated very well and I ended up with many tiny slow growing blueberry seedlings. I have waited two years, before planting them into their final location and I have kept them in a rather small container in peat without any additional fertilizer. They could be a lot happier if i’d give them some food earlier, but they managed to grow anyway. When I planted them into mound of peat outside last year, they immediately started growing large shoots (compared to existing growth). In autumn, it became evident, that most of the seedling set up their first flower buds. Some failed to survive the weight of snow during the winter.

Young, nicely colored leaves

Seedlings at the beginning of their third growing season.


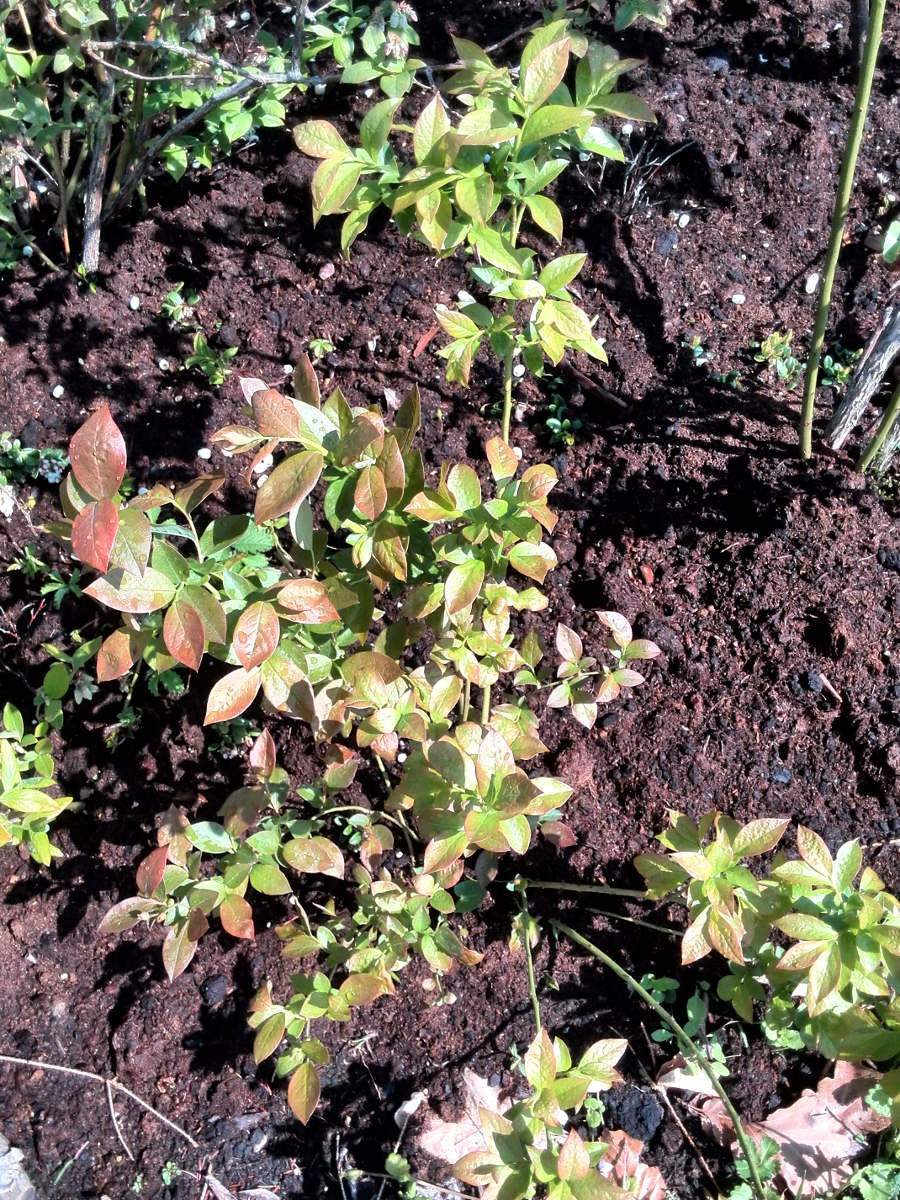
Third growing season

In early spring, buds started opening
In early spring, buds started opening.

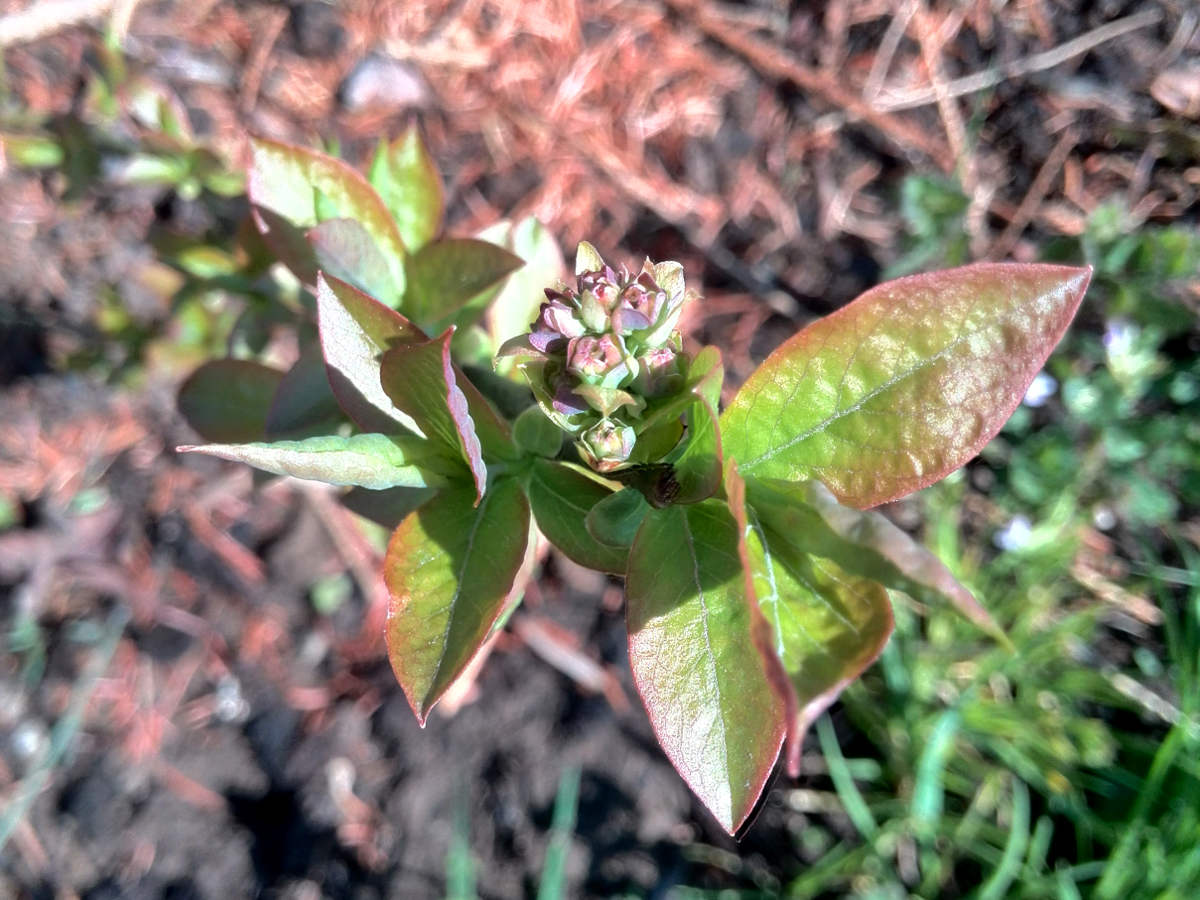
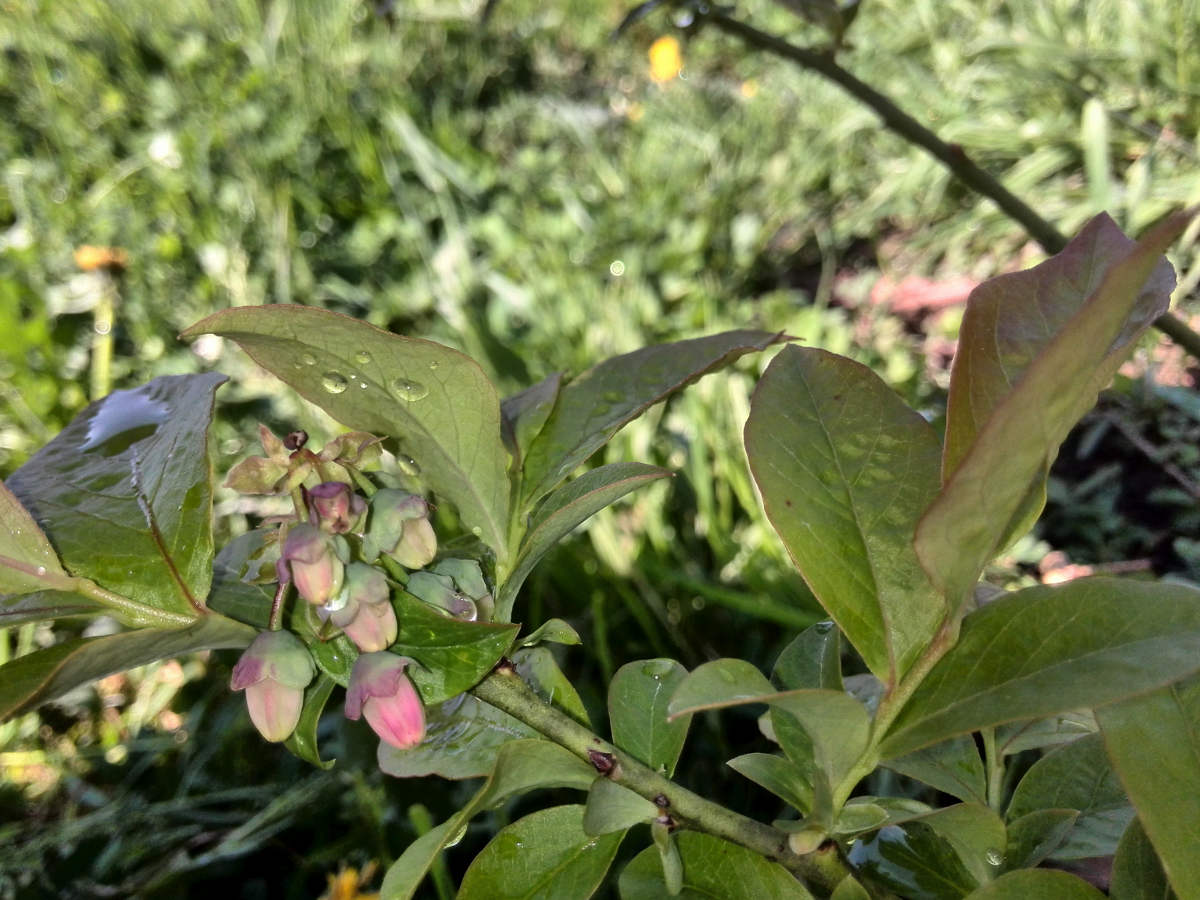
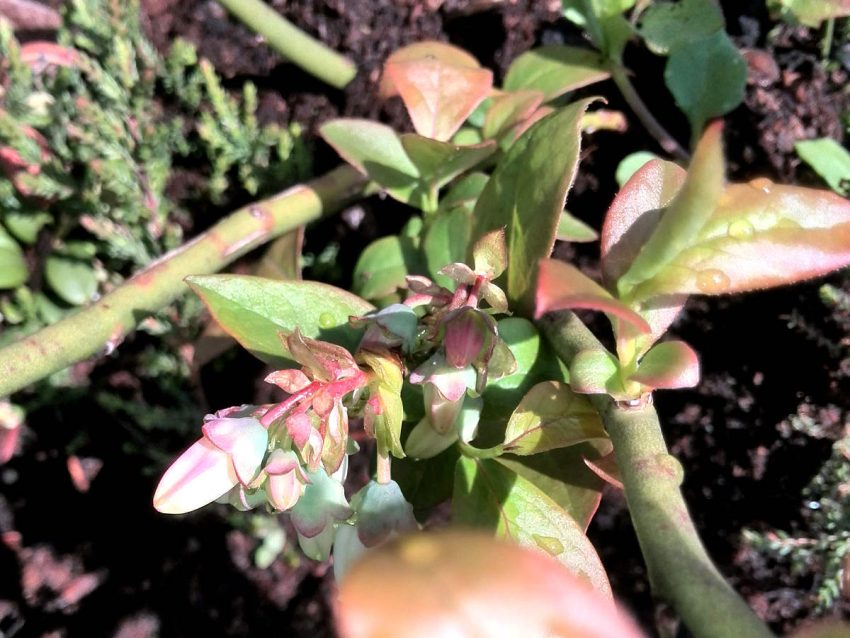
In early spring, the buds started swelling and I noticed they will start even more vigorous than last year. All the 1 year old shoots started leafing out early with nice red colored young leaves. All the shoots were extremely healthy and small seedlings soon began to look like nice little bushes. Some of the shoots have already started flowering. Flowers and leaves seem to be similar to their parent plants, but there is one plant with slightly different flowers. One of the seedlings have flowers which have much smaller opening of the flower. Despite being tighter and possibly harder for the pollinators to pollinate the flowers, there did not seem to be any issues regarding pollination.
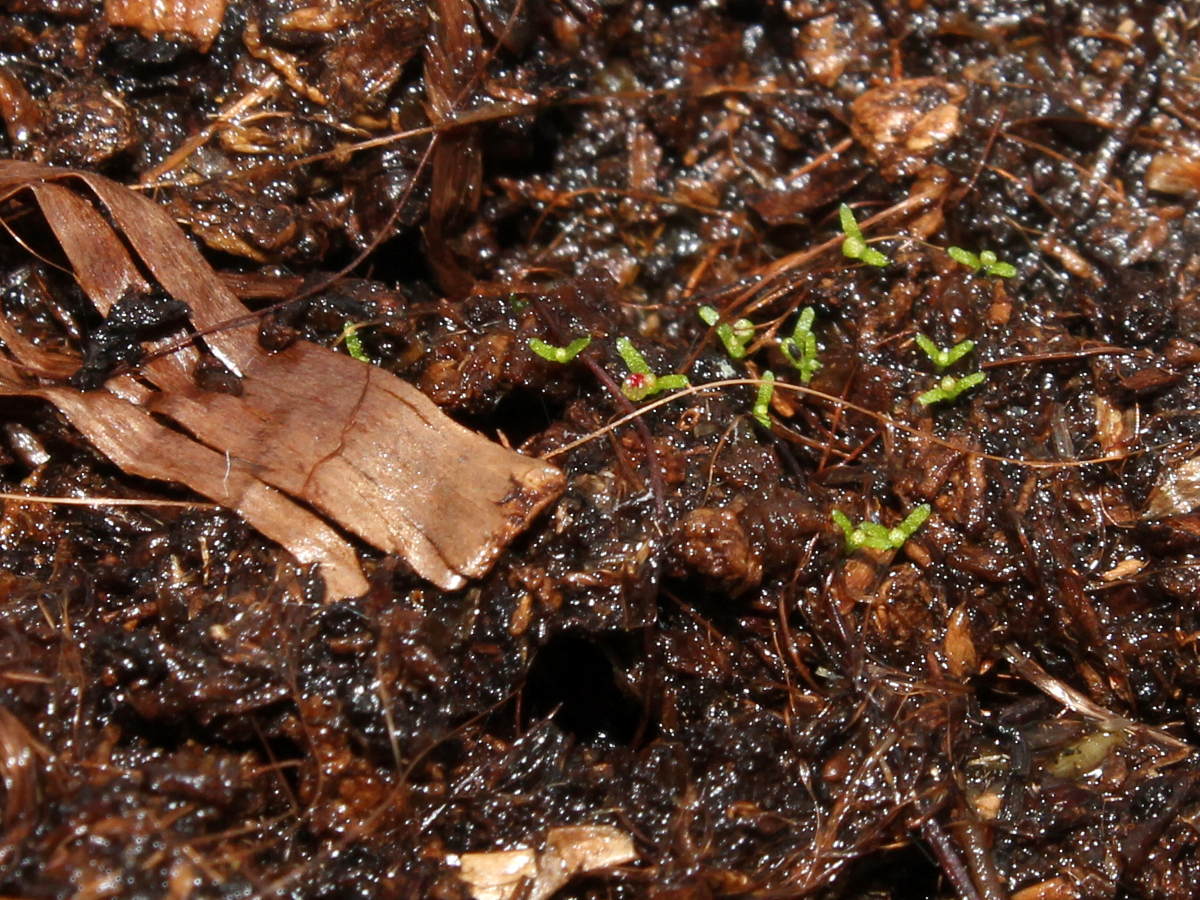
FIRST FLOWERING

I didn’t expect them to start flowering so early, as they are not taller than 30 cm with shoots just a few mm thick. At first, when flower buds opened, flowers appeared to be small and perhaps even a bit distorted with stigma pointing out of developing petals. Later, flowers developed normally and the seedlings started flowering at the same time as their parents. It will be interesting to see their fruits when they ripen. Plant appearance is roughly identical to their parents so I’d guess the fruits will be the same  as well.

Flowers are identical to those of their parents
During third year, seedlings started flowering


What do you think of this post?
  • Useful (14)
  • Interesting (9)
  • Awesome (4)
  • Boring (1)
  • Sucks (0)
Shooting season is now officialy open
Moso Shooting 2017

Moso Shooting 2017

March 25, 2017 tarzan Comments 3 comments

Winter

Winter damage from the northern side

After unusually dry winter with almost no snow cover and two months of uninterrupted below freezing temperatures, spring came early. Due to lack of snow cover, soil got frozen down to 50 cm deep. That made me think that Bamboo shooting season will be postponed for quite some time. Fargesia Rufa started late and I believed my Phyllostachys bamboos will also need a bit longer to finally wake up. Moso proved me wrong.

Top layer of leaves got burnt, leaves below remained protected

Winter did some damage to the Phyllostachys pubescens ‘Moso’ seedling this year. Not as much as I would have expected, though. Despite being frozen solid, most of the canes survived with moderate leaf loss. North facing side survived almost completely undamaged while southern, more exposed side took quite some damage. Older, smaller culms got defoliated completely this year, which was a surprise to me, because I expected the older and completely hardened culms will have much better chances, compared to young and tall culms. Youngest culms from previous spring were not damaged until the worst cold hit us. Low temperatures around -15°C, sunny and windy weather with soil being completely frozen, managed to burn some of the leaves. I can only guess how they would look like if the soil would remain thawed.

First shoots came early

First Moso shoot of the year

To my surprise, I have found first Moso shoots on March 25th. That is the earliest Moso shooting date (well actually it’s a tie with season 2014) so far. Until this season, the first to poke out of the soil were always very small shoots that grew on the edges of the grove where I severed the rhizomes. Not this year. The first shoot I saw is already larger than shoots from last year. I accidentally exposed it when I decided to water the bamboo. When I looked a bit closer, I noticed more a bit smaller shoots on the western side of bamboo clump.

Three weeks of warm and sunny weather warmed up the soil and grass started actively growing. It didn’t take long for the first fruit trees to wake up as well. On the very same day when I noticed Moso shoots, apricots opened their flowers. Everything  re-started in fast forward mode this year.

I have not noticed the second shoot until I checked the snapped photo.
One of largest shoots so far trying to reach for some light

Upsize

At first it didn’t look like there will be any upsize. Shoots were not as large and seemed more juvenile compared to the larger shoots last season. Eventually, they started getting thicker and started showing Moso specific features. It seems that last year, shoots started from deeper down in the soil, because I have added some soil and mulch around the bamboo during the previous year.
As the shoots started growing, it became evident, that there was some upsize, compared to last season. Like last year, there were many small(er) shoots that arrived earlier. I have left all the shoots intact, like in previous years. Smaller shoots can always be pruned off later on during the season, if the grove becomes congested.

Shoots have increased quite a bit this year

To compare the size of the shoots, I use 1 Euro coin


Spring freeze

The upsize in  some parts of the clump was impressive
The upsize in some parts of the clump was impressive

In late April, temperature plunged down to -5°C a couple of nights. Late freeze did a lot of damage to most of the fruit trees and completely defoliated walnut trees. We’ve had late freeze like this for two year in a row now – this year it got even worse than last year. The freeze, however, did no damage to the bamboo shoots. They were quite tall already at the time and for a while, I got really worried.
After the cold weather, we’ve had some warm rainy days again. Abundance of rain and mild weather (temperatures around 10°C) made the shoots grow much faster again. At that point it became evident that the number of shoots increased this year. Large shoots emerged throughout the whole grove, not just on the eastern side like in previous season. Majority of the large shoots, though, is still facing East.

Large shoot with young anchor roots

I will update this post regularly until the shoots completely leaf out.

What do you think of this post?
  • Awesome (11)
  • Interesting (10)
  • Useful (6)
  • Boring (0)
  • Sucks (0)
Drosera sp. Pretty Rosette from seeds

Drosera sp. Pretty Rosette from seeds

March 4, 2017 tarzan Comments 0 Comment

Drosera dielsiana

Drosera sp. Pretty Rosette seeds

I have been growing Drosera capensis sundews for quite some time and decided to add a few more to my list. The first one is Drosera sp. Pretty Rosette. According to carnivorous plants communities around the internet, Pretty Rosette is supposed to be an unique form of Drosera dielsiana. Like many sundews, it originates from South Africa. It’s rosette forming Drosera and it grows up to 4 cm in diameter. It’s one of the sundews that are fairly easy to handle.

Germination

Seeds are very small, just as all Drosera seeds. First sprouts appeared in 14 days, which was a bit faster than other Drosera seeds I’ve grown, except for the fresh D. capensis seeds I have collected myself. It is almost impossible to distribute the seeds evenly over the surface, so the majority of seeds started growing on a small patch of peat. In time, I’ll transplant the plantlets and give them more space to grow, Drosera  Pretty Rosette is supposed to be small, which means I have some time before they grow that much.

Early growth

In the beginning, the seedlings were growing quite fast. It took less than a week for them to start growing their first true leaves with their sticky traps. The first leaf actually managed to catch a small springtail as soon as the tentacles got dewy.

Seedlings 5 days after germination
6 days old seedlings opening first traps
7 days old seedlings
One of 7 days old seedlings already caught a springtail
3 weeks old seedlings

Seedlings responded well to strong grow light and showed red tentacle coloration from the very beginning. The ones that managed to catch a springtail speeded up growth and remained green, seedlings that were not so lucky, turned red and developed much slower. So far it seems that Drosera Pretty Rosette seedlings are even more effective when it comes to capturing small springtails. At one point, almost all the seedlings have caught something, some of them used two or more traps at the same time.

Carnage in the dense forest of sundews

It will be fun to see how fast I can get them to adult size. They don’t cross pollinate with any of my current sundews, so I’ll have to wait for my other seeds to finally germinate. I want to successfully cross pollinate Drosera capensis with a rosette forming sundew, Drosera spatulata. First seeds have just started sprouting so perhaps by mid summer I will be able to get at least some of them to flower. As soon as the traps get large enough, I’ll start feeding them fish food. I think they should all be ready to find their own food by the end of spring. Insects, beware!

What do you think of this post?
  • Interesting (4)
  • Awesome (1)
  • Useful (0)
  • Boring (0)
  • Sucks (0)
How to Feed Venus Flytrap Seedlings

How to Feed Venus Flytrap Seedlings

February 20, 2017 tarzan Comments 0 Comment

Feeding VFT seedlings from the beginning

Hungry VFT seedlings

Seed grown venus flytraps (Dionaea muscipula) are known as slow growers. They usually take at least a couple of years to reach maturity, which makes growing flytraps from seeds less tempting. If you start feeding the tiny little traps early, you can speed up their growth considerably. First traps are usually way too small to consume whole insects, which means they need to be fed much smaller chunks. I use the same food as with my Drosera capensis seedlings – beta fish food.


What to do about those tiny little traps?

Oral setae on the other side can be used to stimulate the trap to close completely

The main problem, when it comes to feeding the young Dionaea seedlings is the size of their traps. They are way too small to eat anything larger than square millimeter. I’m using wet beta fish food, further diluted with distilled water. I grind larger chunks with toothpick, so they can fit into juvenile traps. Toothpick can be a bit too thick to fit ‘jaws’ of small sized traps, so I decided to use a sheath of my bamboo seedling. You can also sharpen the toothpick, it should do the job just as good. I am using bamboo sheath because it has oral setae on the other side, which comes handy when you have to stimulate the trap to close completely. It is hollow and can hold the fish food paste much better than toothpick.

Sharpened end of tiny bamboo sheath

I use scissors to make the pointy end sharper, which enables me to reach small traps easier and successfully deploy the food. Trap usually closes almost completely, but as it needs to be triggered a few more times, I brush it from both sides with the bristles. Traps usually fully close after they capture a living insect that moves inside the trap. If dead insect or in my case, fish food is used, traps need to be stimulated to start the digestion. I make two rounds brushing the traps, sometimes even more, just to be sure the traps will close. I have been quite successful in doing so.

Digestion

1 month old seedlings growing faster after the first feeding

In most cases, traps reopen in 3 to 10 days. The more food you place inside, the longer they need to digest. There are other factors as well, such as seedling’s health, amount of light and temperature. At higher temperature and higher light level, the process speeds up considerably. A week or so after the feeding, seedlings start showing increase in growth speed, putting out numerous new traps that also get larger. The larger they get, the easier it gets to feed them and larger chunks of food they can digest. As they grow larger, their growth speed also increases, considerably!

What do you think of this post?
  • Interesting (7)
  • Useful (5)
  • Awesome (2)
  • Boring (0)
  • Sucks (0)

Posts navigation

OLDER POSTS
NEWER POSTS

Recent Posts

  • Bamboo shooting date analysis – 2012-2024
  • Impatiens niamniamensis – Parrot impatiens pollination
  • Culm color of variegated Phyllostachys arcana seedlings
  • A Comprehensive Guide to Growing Rhododendron from Seeds
  • Cultivating Springtails for Terrarium Success

Latest Post Images

Post imagePost imagePost imagePost imagePost imagePost imagePost imagePost image

Recent Comments

  • tarzan on Blueberry seeds
  • Graydon on Blueberry seeds
  • Tomas Dvořák on Bamboo Shooting Calendar
  • Tomas Dvořák on Bamboo Shooting Calendar
  • Tomas Dvořák on Phyllostachys arcana seedling’s culm coloration

Categories

Recent Posts

  • Bamboo shooting date analysis – 2012-2024
  • Impatiens niamniamensis – Parrot impatiens pollination
  • Culm color of variegated Phyllostachys arcana seedlings
  • A Comprehensive Guide to Growing Rhododendron from Seeds
  • Cultivating Springtails for Terrarium Success

Recent Comments

  • tarzan on Blueberry seeds
  • Graydon on Blueberry seeds
  • Tomas Dvořák on Bamboo Shooting Calendar
  • Tomas Dvořák on Bamboo Shooting Calendar
  • Tomas Dvořák on Phyllostachys arcana seedling’s culm coloration

Categories

Archives

Tag Cloud

alba Aquatic plants arcana bamboo blueberries blueberry borinda cape capensis carnivore carnivores carnivorous clumper color culm cuttings damage drosera edulis fargesia featured feeding fungosa Germination leaf Luteosulcata moso overwintering phyllostachys plant propagation protection pubescens running seed Seedling seedlings seeds shoot shooting spring sundew variegated variegation winter
© 2025   COLD-HARDY.COM